How to Create DIY Festival Badges That Automatically Sync with Each Other
Build DIY festival badges that self-sync using ESP32 and ESP-NOW. Step-by-step guide: materials, circuit assembly, ESP-NOW code, LED animation, testing, and tips. No master device needed.
Introduction
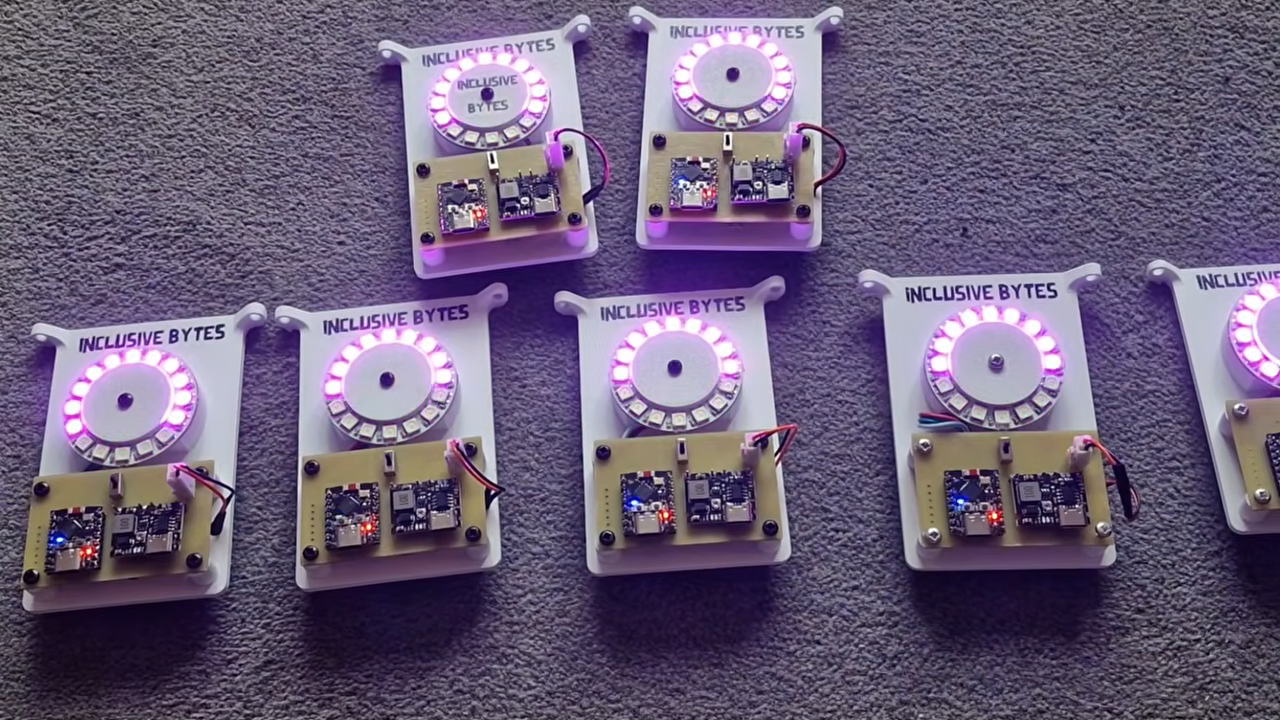
At many music festivals, attendees wear glowing badges or wristbands that flash in sync with the performance. While commercial versions rely on centralized transmitters or complex pairing, maker Tony Goacher developed a clever alternative: badges that synchronize themselves without any infrastructure. Each badge uses an ESP32 microcontroller and the ESP-NOW wireless protocol to share a local clock tick. All badges in range automatically converge to the highest clock value, enabling synchronized LED sequences. This guide walks you through building your own self-syncing festival badges from scratch.
What You Need
- ESP32 development board (e.g., ESP32 DevKit V1)
- 16-addressable RGB LED ring (e.g., NeoPixel ring)
- Battery pack (3.7V Li-Ion or 2xAA) with JST connector
- Breadboard and jumper wires (for prototyping)
- USB cable for programming
- Arduino IDE installed on your computer
- ESP32 board support in Arduino IDE (via Board Manager)
- FastLED or Adafruit NeoPixel library
- GitHub files from Tony Goacher's CrowdClock repository
Step-by-Step Instructions
Step 1: Prepare Your Development Environment
Install the Arduino IDE and add ESP32 board support. Open File > Preferences and paste the following URL into Additional Boards Manager URLs: https://raw.githubusercontent.com/espressif/arduino-esp32/gh-pages/package_esp32_index.json. Then go to Tools > Board > Boards Manager, search for esp32, and install it. Next, install the FastLED library (or Adafruit NeoPixel) via Sketch > Include Library > Manage Libraries.
Step 2: Assemble the Badge Circuit
Connect the ESP32 to the LED ring as follows:
- LED ring VCC → ESP32 5V (or 3.3V if your ring works at 3.3V; check datasheet)
- LED ring GND → ESP32 GND
- LED ring DIN (data in) → ESP32 GPIO pin (e.g., GPIO 13)
If using a breadboard, insert the ESP32 so that pins are accessible. Connect the battery pack's positive to the ESP32's VIN (or 5V) and negative to GND. Tip: Add a 100 µF capacitor across the LED ring power lines to avoid voltage spikes.
Step 3: Understand the ESP-NOW Synchronization Mechanism
The key idea: each badge maintains an internal clock tick counter that increments at a fixed rate (e.g., every 10 ms). When a badge broadcasts its current tick value via ESP-NOW, all nearby badges receive it. If a receiving badge has a lower tick value, it jumps to the received value; if it is equal or higher, it stays. This way, the highest tick propagates and all badges converge. No master device is needed—the network self-organizes.
Step 4: Write the Code
Open the Arduino IDE and create a new sketch. Below is a simplified structure you can expand using the GitHub files:
- Include libraries:
#include <esp_now.h>,#include <WiFi.h>(required for ESP-NOW), and#include <FastLED.h>. - Define constants: number of LEDs (16), data pin, clock tick interval (e.g., 10 ms).
- Set up ESP-NOW: Initialize WiFi in station mode, register a send callback and a receive callback.
- Implement broadcast: Every tick interval, increment the local tick and broadcast it.
- Implement receive: In the receive callback, check the received tick; if higher than local, update local.
- Add LED animation: Use the synchronized tick to drive patterns like rainbow, pulse, or chase.
Refer to Tony's GitHub files for the full code. The critical function is the ESP-NOW receive handler that performs the clock sync.

Step 5: Upload and Test
Select your ESP32 board from Tools > Board and the correct COM port. Upload the sketch. Power up two badges within 5-10 meters of each other (ESP-NOW range is roughly 30 meters indoors). You should observe that after a few seconds, their LED patterns align perfectly. To verify, you can add serial print statements showing local tick values.
Step 6: Encase and Wear
For a festival-ready badge, place the ESP32, battery, and LED ring inside a 3D-printed or laser-cut enclosure. Use a lanyard or clip. Ensure good ventilation for the ESP32 (it can get warm). Apply hot glue to secure connections.
Resources and Tips
- GitHub repository: CrowdClock by Tony Goacher contains schematics, full code, and PCB designs.
- Battery life: Use a 1000 mAh Li-Ion battery for hours of operation. Put the ESP32 in deep sleep between ticks to save power (not covered in this guide but achievable).
- Custom patterns: Modify the
showPattern()function to match festival themes or your own designs. - Range: ESP-NOW works reliably up to 30 meters line-of-sight. Walls reduce range. For larger crowds, consider adding a repeater badge.
- Debugging: If badges don't sync, check that all are using the same ESP-NOW channel and peer MAC address (broadcast works with
esp_now_send()to the broadcast address). - Safety: Ensure the battery is protected (use a protected Li-Ion cell). Avoid exposing the badge to water unless you seal it.
Conclusion
By following these steps, you’ll have a set of festival badges that synchronize automatically without any central hub. The approach is elegant: leveraging ESP-NOW for peer-to-peer clock propagation creates a decentralized, self-healing network. Whether you’re enhancing a music event or just enjoying a DIY project, these badges bring a professional-looking synced light show to any gathering. For deeper understanding, check out how commercial concert wristbands use similar concepts but with a master transmitter.
Video demonstration and additional details are available in the original article (see link in resources).